Testing 3D print resin involves evaluating its physical properties, such as strength, durability, and flexibility, as well as its chemical properties, such as chemical resistance and UV stability. Here are some steps you can take to test your 3D print resin:
Print a sample: Start by printing a sample of your resin to test its properties. This sample can be in the form of a simple cube or any other object that you want to test. And here are some stl file you can use for resin test:
1#. Ameralabs Town
Designed by AmeraLabs, a Lithuanian resin manufacturer, the Town is an all-purpose calibration part that tests both printer settings and resin quality. In total, there are 10 different tests integrated into the model, as indicated by the various “buildings” protruding at various angles. Its effectiveness makes it the frequent subject of resin printing videos and tutorials.

Ameralabs Town (Download Source: Amerlabs)
2#. Make: Rook
The test with twists, overhangs, and fine details including a staircase and visible text.

Make:ROOK(Download Source: MAKE)
3#. SLA test model
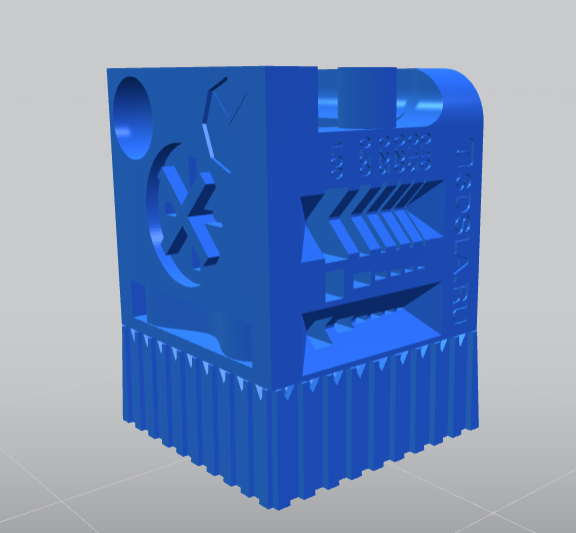
It provides 2 types: With the support or not. There are six sides in total, containing nearly 20 tests. This model can be very comprehensive to evaluate the performance of your printer and resin. Including these tests on a model is pretty amazing, the only downside is that there are no instructions in English, maybe you need to use google translate or something to get the right guide.

Due to post limits, more test files cannot be displayed and shared. But I think these models are enough for us to understand the printing performance of the machine and resin, and more importantly, we need to read carefully and understand the significance of the test.
Test the physical properties: Once the print is complete, test the physical properties of the resin by applying pressure to the sample to test its strength and durability. You can also bend the sample to test its flexibility and see if it breaks or cracks. Most responsible manufacturers will provide these parameters for user reference. It can help the user know this type of resin whether this fit for their projects.
This is an example, so let's take this document as an example
GratKit ABS-Like Resin TDS

- Shore Hardness: Shore Hardness is a measure of the resistance a material has to indentation.
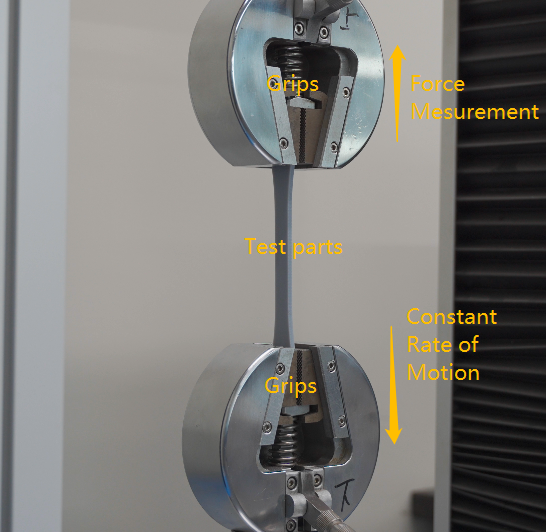
- Tensile Strength&Tensile Modulus:
Tensile strength is the maximum load that a material can support without fracture when being stretched, divided by the original cross-sectional area of the material.
The tensile modulus of a solid material is a mechanical property that measures its stiffness. It is defined as the ratio of its tensile stress (force per unit area) to its strain (relative deformation) when undergoing elastic deformation. This property has units similar to pressure, that is, Pa (N/mm2), psi, etc.
The tensile modulus is useful for evaluating how stiff a material is. In other words, how much the material is expected to deform (elastically) when subjected to a particular load. The higher a material’s tensile modulus is, the more force is required to deform it.

- Elongation: Elongation is defined as the length at breaking point expressed as a percentage of its original length (i.e. length at rest). If a rubber reaches twice its length before breaking its elongation percentage is 100%.
- Flexural Strength&Flexural Modulus:Flexural strength, also known as modulus of rupture, or bend strength, or transverse rupture strength is a material property, defined as the stress in a material just before it yields in a flexure test. Most brands of resin use a three-point flexural test technique. [wiki]

Check the surface finish: Inspect the surface finish of the print to see if there are any deformities, roughness, or warping.
Check the chemical properties: Test the chemical properties of the resin by exposing the sample to various chemicals, such as acids or solvents, to check its resistance. You can also test its resistance to water and other fluids.
Test the UV stability: If your resin is intended to be used outdoors, you should test its UV stability by exposing the sample to direct sunlight for a prolonged period and observing any changes in its color, strength, or surface finish.
Compare with other resins: Finally, you can compare the performance of your resin with other similar resins to see how it stacks up in terms of quality and performance.
Overall, testing 3D print resin requires a combination of physical and chemical tests, which can help you identify any weaknesses or potential issues with the resin, allowing you to make adjustments to improve its performance.
Alright, if we know these, can we start it now?
You may need to know the 3d printer may affect your resin test. The properties of the resin can be affected by several factors, including the 3D printer's print settings and the printer's capability to accurately reproduce the design.
For example, the printer's build platform temperature, the resin's curing time, the layer thickness, and the printing speed can all impact the final properties of the printed object. The printer's ability to maintain a consistent temperature and apply the resin in a precise manner can also affect the resin's physical properties.
Therefore, when testing a resin, it's essential to take into account the 3D printer's specifications and printing parameters. It's also important to make sure the printer is well-calibrated and properly maintained to ensure consistent results. By doing so, you can get a better understanding of how the resin will perform when printed on that specific printer, which can help you optimize your printing process and improve the quality of your prints.